Way back at the end of Sept, after the termite exterminators had finished their work, we were just days away from driving down to FL to move onto our boat. The mast was off our boat and we needed to replace our chainplates, so we decided to leave the mast down until we arrived. That would allow us to remove the chainplates and have new ones made. When the mast is on the boat it is held in place by stainless steel cables called shrouds. The cables run from the mast down to the deck and attach to stainless steel plates. Those plates are the chainplates. On our boat those plates run through the deck and are bolted to the inside of the boat. Our chainplates were the original ones, so they were 33 years old and the insurance company would not insure our rigging and mast until our chainplates had been replaced.
So, we needed to remove the chainplates and have new ones machined. We have six chainplates held in by 24 bolts. Easy enough to take the nuts and bolts off, but the chainplates and bolts are hidden behind wood panels that are put together like a 3-D jigsaw puzzle. The chainplate covers come off with just three screws and you can get to the nuts, but then you can’t reach the backs of the bolts. To reach those you need to remove a divider inside a cabinet, but you can’t remove the dividers until you remove the top panel. Of course, you can’t remove the top panels until you remove some stringers. On top of that the forward pair of chainplates has bolts that pass through a wall and require one person to climb into a hanging locker in the forward cabin while a second person climbs onto a seat and reaches into a cabinet in the main salon. Then to top it all off the previous owners sailed the boat up north to Alaska, so they glued insulation to the inside of the hull. We had to cut insulation off the hull to remove panels, but what’s one more step at this point?
Week 1: We take the chainplates out and send pictures to Allied Titanium to see if they can make us a new set. Unlike stainless steel, titanium chainplates will never need to be replaced. Stainless steel chainplates can rust and crack if water gets trapped where the chainplates pass through the deck. Stainless requires oxygen to remain stainless. The chainplates are sealed to keep water out from below deck, but if that seal leaks water can get trapped next to the chainplate. That cuts off oxygen and introduces salt. That’s a bad combination for stainless steel. If that chainplate rusts enough it will snap and the mast can come tumbling down. Titanium does not have that issue, so while it is more expensive it is a “one time” deal. We would put them in and never worry about them again.
Week 2: I have to go to Colorado for work and Wendy joins me. Allied Titanium calls me to let me know they can’t match the funky bend our chainplates will require. Two weeks down the drain.
Week 3: When we get back to Florida we take the chainplates over to machine shop number 1 that the local rigger suggests. The machine shop specializes in marine hardware. The machinist takes a look at the chainplates and says they are in good condition; they only need to be cleaned. He suggests polishing them with 220 grit sandpaper and reinstalling them.
I clean the chainplates with a sander and don’t like the looks of them. We take them over to the rigger to inspect and he says they are way past their expiration date. He expresses his disappointment in machine shop 1 and sends us to machine shop 2.
At machine shop 2 we meet the machinist who starts out with, “Oh, no, not chainplates. I hate doing chainplates. Sailors always want them to be perfect “. I’m already excited about this shop. He says he should be able to get the new chainplates built in a few days, but he’ll call first with an estimate. A few days go by and nothing. I give him a call and learn he is waiting to hear back on prices for the 316 stainless steel we what. He promises to call back soon.
Week 4: I wait another week and call him back. He apologizes and says he thought he had already called me. After only 10 days we have a quote, but it is so cheap we quickly get over the delay. He expects to get the material in on Friday, so that week is gone.
Week 5:
In the meantime the rigger has been looking at our mast and has some suggestions for us.
As long as the mast is down it is a good time to replace all those incandescent lights with much more efficient and expensive LED lights. The LED lights allow our batteries to last much longer and with an expected burn time of 50,000 hours, they will last virtually forever. The mast is lying on the ground and everything is easy to reach, so why not? It’s only four lights, a masthead light, the steaming light and two deck lights. Add in some labor and call it an even $1000.
Later this year we will be replacing some electronics, so he also suggests running a line through the mast while it is laying down that can be used to pull new wire through the mast after it goes back up. This job is much easier to do while the mast is on the ground. Add another $200.
Oh, and we’ll need a new mast wedge. There is a great new product that seals the space where the mast passes through the deck while offering terrific support. It is a wedge that will last for life; if we do it now we’ll never have to worry about it again. It does require a bit of labor, but the kit is only $200. What a bargain, how can we pass that up? Of course, once he adds labor, I’m sure that will jump up some.
Weeks 6 through 9 quickly disappear while we wait for the chainplates to be built. It was always just another couple of days. "The stainless steel has not yet arrived from the supplier", "someone got sick", "we had a rush job get in the way", "they are nearly finished" and finally, "they have been finished for a few days, didn’t anyone call you?" By the time we get the chainplates back we are into December, but it turns out they really weren’t finished at all. The top part of the chainplates should be polished to a mirror finish. We talked about that when I ordered the chainplates and we were both in agreement that was part of the deal. When I arrived to pick up the chainplates they were not polished and he tells me they don’t do that there. At that point I just wanted the chainplates, so I paid and got out of there. They were still a good price, just not quite as good as I thought.
Then we needed to find a shop to polish the chainplates. We went back to machine shop 1 and ask him to polish the plates. He says we should have come to him in the first place. We didn’t bother reminding him that we did come there first – we really needed this job done and didn’t want to get in an argument with the guy we're asking to do the work. He says he is pretty busy and it will take a couple of weeks. I’m thinking what’s another couple of weeks at this point? He found time and actually got them done in a week. Finally, we got a break. Unfortunately, by then I was swamped with work from my job.
During the time that we had the chainplates, but no time to install them, Wendy woke up in the middle of the night and ran out to the main saloon to write something down. She had been laying in bed, thinking about the mast, plus everything else we needed to do and came up with a poem. So, here is what she composed:
The Mastless Sailboat by Wendy Klein
Our boat has no mast
It did in the past
Termites invaded; they came onboard
Termites on a sailboat?
Good lord!
Down with the mast, down with the rigging
Our boat had to be tented to keep those suckers from digging
Now tent and termites are all long goneBut still there’s no mast, what could be wrong?
Well everything takes longer on a boat you see.
Once one thing is fixed a new situation arisesThis boat is just full of not good surprises!
We must be patient, we live on a boat
For now, at least, we are still afloat
The EndObviously, the stress was getting to her if it was keeping her up at nights long enough to write a poem in her head.
My job kept me busy up to Christmas when we travelled back to TX then I had shoulder surgery and then after just four months we had the chainplates and the time to install them. No big deal, just bolt them back in and we’re good to go. Then we noticed a new issue. Most sailboats are solid fiberglass below the waterline and cored fiberglass above. That means that the deck has a thin layer of fiberglass with about half an inch of balsa wood under it then another thin layer of fiberglass below that. This lets the builder make a light, stiff deck which is great, but water can get in to the wood and the deck can delaminate which is bad. Most modern boats seal off the wood any time they put a hole in the deck, but long ago that was not common. Our boat was not sealed where the chainplates pass through the deck. So, at all six spots we needed to scrap out the wet wood and fill the holes with fiberglass resin. That went pretty quickly and then we just had to wait 24 hours for the resin to cure. Once all cured we had to drill the holes out again and use a Dremel tool and file to get the holes into the right shape. At that point we thought we were finally ready to install the chainplates, so we started to put them in only to find that they were slightly different from the original ones and did not fit back into the original holes. They were close, but we only had to make the holes larger. A little more filing and we were ready to go. The chainplates went in, the holes were filled with marine caulk, compression plates were put on top of the caulk and the job was nearly complete. 24 hours later we tighten the screws in the compression plates then ran water over the chainplates and looked for leaks. No leaks! We were finally finished!

Chainplate hole filled with resin.

Resin with drill holes.

Wendy using the Dremel tool.

Squared edges and ready for chainplates.

Chainplates all installed. That's those little silver things sticking up through the deck.

This is the bottom of the chainplates running a foot below the deck with 4 bolts through them.
me with Gorilla tape to make sure the resin stayed in place. 24 hours later we pulled the tape off and were left with nice smooth fiberglass. Now the deck around the mast is rock solid and water and termites can never get in there again.

Before starting. That wood on top is a piece of plywood over the hole to prevent rain from coming in.
 Damage caused by termites. The upper and lower sections are the fiberglass.
 Filled with resin and sealed off with tape.
At that point we were ready to have the mast installed; we
just needed to get on the schedule for the crane and the yard workers. After a week we were on the schedule, but
when the big day came it was raining, so they cancelled. That worked for us since we would have a big
hole in our cabin top while they put the mast back in place. We waited through the weekend and finally on
Tuesday they were ready to go. We were
scheduled for 1pm, but of course the crane showed up late so we actually got
started at 2pm.
We were not around when the mast was pulled, so this was all
new to us. The first thing they had to
do was tie lines to the mast so the crane would have some way to connect the
hook to the mast. Then the crane lifted the mast up into the air and moved it
over the boat. The crane operator slowly
lowered the mast while the crew guided it into the top of the boat. After seating the mast onto the mast step the
crew began to connect all of the shrouds (the steel cables that hold the mast
in place) and loosely adjust them. The
final adjustments wouldn’t be until later. Like everything else with this process, “later”
meant the following week.

The crane ready to lift the mast off the cradles.

Crane lifting our mast into the air.

Preparing to drop the mast into the boat.

All lined up are ready to go.

At this point someone is down below making sure the mast seats on the step properly.

Installing the forestay and the shrouds.

Oops, they tied the line in the wrong place and the rigger needed to go up the mast to remove the crane hook.

Hook is clear and the crane is moving away.

The mast is installed!

The crane retracts and prepares to drive off to its next job.

A celebratory drink after getting the mast back on the boat.

Mast installed, but waiting for the electrician.
The day finally came to create the mast wedge. The crew came out to the boat and moved the
mast around until it was centered in the hole then tied it in place. Next they sealed off the rest of the hole
with putty. After that they covered everything
around the mast with blue painters tape and sprayed the deck around that with WD-40. Apparently, if this stuff gets on the deck it
will be there for life, so all of the preparations keep it from adhering in
case of a spill. At last they mixed up
the Spartite and carefully poured it around the mast hole. They managed to only spill two drops and
those landed on the tape. At that time
we had to let it set up for forty eight hours.
As long as we keep a sun cover over the Spartite wedge it will never
leak and never need to be replaced.

Mast being prepared for Spartite wedge.

Rigger pouring the Spartite.
Two days later the rigger came back to make the final
adjustments to the shrouds, install the boom and reconnect the antennae to the
SSB radio. Naturally, there was someone
else who needed to come out to reconnect all of the wires for the lights and
radar, and naturally, that would be next week.
In the mean time we were able to wash the boat. The WD-40 on the deck made it as slippery as
ice and it was also attacking a lot of dirt.
Boat scrubbed down and looking pretty we dragged our sails
out and reinstalled them on the boat. Our
sails are fairly small for a boat this size – only 750 square feet of
area. They are a heavy duty fabric though,
so each sail weighs about as much as Wendy does, but they aren’t as easy to
carry. The mainsail goes on the boom
first then goes up the mast top first.
It sounds fairly straight forward, but we managed to screw it up the
first time. Somehow we got a twist in
the sail and didn’t realize it until we were nearly finished putting the sail
into the mast track. So, we got to take
the sail almost all the way off and redo all of our work. In the end we got it right and had a set of
sails on the boat once again.
The following week the electrician showed up, connected all
the wires and we were back in business.
It looked like everything was complete and we could check
that work off our list, but it was not to be.
The first time it rained we found a leak at the mast. There is a steel tie rod just in front of the
mast that is supposed to help keep the deck from shifting around the mast when
the boat is sailing. That rod was not
tighten down and resealed, so it leaked.
No big deal, we’ll put some sealant on there and tighten it up to get it
sealed. Also, our new deck lights do not
work, so they’ll be coming out to take a look at those.
By this point we have long since stopped counting weeks and are counting months. We are at 4.5 months since first beginning this project. Our total bill, including the exterminators, was in the neighborhood of $8000. However, that did include several upgrades and the boat is in much better shape than it was previously. We’re finally at an end to this project and glad to be
there. Next up we’ll re-bed all of our
lifeline stanchions, but at least we’re a sailboat again and not just a boat
with a hole in the top.
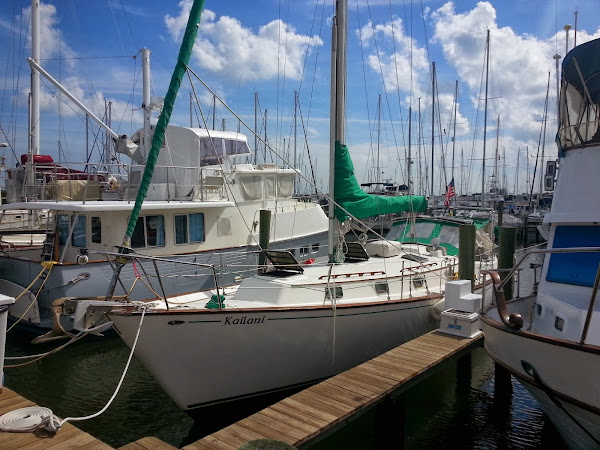

Kailani all shipshape and back in her slip.